

How To Run Lots Of Bulk Wire And Keep Them Straight
How to Wire a Finished Garage
Upgrade wiring the easy way.
![]() Fourth dimension
Fourth dimension
Multiple Days
![]() Complexity
Complexity
Intermediate
![]() Price
Price
$101–250
Introduction
If your garage doesn't have enough outlets and you're sick of squinting to run across what you're working on, then heres the solution. Using PVC conduit and metallic surface-mount electrical boxes, well show you how to connect additional outlets to an existing garage outlet and how to add together bright, energy-efficient fluorescent lights to an existing ceiling box without cutting into your walls or fishing wires.
Tools Required
Materials Required
- i/ii-in. PVC couplings
- 1/ii-in. PVC male adapters
- 1/ii-in.electrical connector locknuts
- one/4-20 x three-in. two-piece toggle bolts
- 10-ft. lengths of 1/ii-in.
- fifteen-amp receptacles
- 15-amp single-pole switch
- 4-in. square raised covers
- 4-in. square x i-one/2-in.-deep metallic boxes
- 90-degree PVC bend with hub
- Black THHN 14-judge*
- Box extender (Raco 187 or similar)
- Bulbs or tubes
- Container of PVC electrical conduit glue
- Dark-green ground screws
- Dark-green THHN 14-gauge*
- Lite fixtures
- PVC conduit
- Screw-in drywall anchors
- Straps for i/two-in. PVC
- Use 12-judge wire for 20-amp circuits
- White THHN 14-gauge*
- Wire connectors
Let there be calorie-free! And more fixtures, too!
In our garage, nosotros extended conduit from an outlet to add outlets and a hanging fixture over our workbench area. We too removed a ceiling light fixture and extended wiring from information technology to install 8 new fluorescent fixtures. Remember, though, your existing wiring may not be adequate for large ability tools like saws or ability-hungry appliances like refrigerators or freezers. For these yous may have to add a new circuit, a project we won't cover in this story.
First we'll show you lot how to fix for installing PVC conduit past calculation an extender to your electrical box. Then we'll bear witness you how piece of cake it is to cut and install PVC conduit and button wire through it. Finally we'll show you how to hook up the outlets and lights and make sure everything is properly grounded.
Installing the PVC is simple, but you lot'll need a basic agreement of electric wiring to safely connect the wires. We'll bear witness y'all how nosotros wired our outlets, switch and lights, just if your wiring is dissimilar and you're not sure how to make the connections, consult a wiring manual or get advice from an electrician. Whatever you do, pull a permit so an inspector can check your work.
If yous have aluminum wiring, don't work on information technology yourself. The connections require special techniques. Phone call in a licensed electrician who is certified to work with it. For more information, go to cpsc.gov and search for "aluminum wiring".
Plan the system
The first footstep is to draw up a simple sketch and figure out how many outlets and lights you plan to add together. Keep in listen that there is a limit to how many lights you can add to ane excursion. The maximum number of fixtures is determined by the capacity of the excursion, assuming at that place is zero else on the circuit that would be turned on at the same time. The maximum wattage of electrical load that can be turned on continuously for three or more hours is 1,440 watts on a xv-amp circuit and one,920 watts on a xx-amp circuit (which includes a twenty percent reduction for safe).
When your plan is consummate, make a list of the materials you'll demand. Below is a list of the parts we used for this project. Use this equally a guide for making your own list. If you need a single-gang to 4-in. square steel box extender like the one we used, you may have to special-order it or pick it up at an electric supplier. As well, match the wire gauge to your circuit. Purchase 14-gauge wire if your circuit is protected by a 15-amp circuit billow and 12-gauge wire if it'southward protected by a 20-amp circuit billow.
Information technology's easy with PVC conduit

You'll find a variety of PVC fittings that let y'all turn corners and run the conduit exactly where you lot want it.
To add lights and outlets, you could spend days crawling around your cranium and snaking wire through walls. Merely running wire through PVC conduit mounted on walls and ceilings makes the job faster and a whole lot less frustrating.
At dwelling house centers, y'all'll notice a diverseness of PVC fittings that let you turn corners and run the conduit exactly where you want it; no need to learn the art of bending conduit every bit there would exist with metal. And unlike metallic, PVC plastic is quick and easy to cut. If y'all goof up, you lot can cutting out your error and add new parts using couplings. Information technology couldn't exist simpler. And conduit makes your wiring more versatile because you can always add together to or reconfigure the wiring later on.
Project step-by-step (16)
Step ane
Working with PVC
Glue the adapters to the conduit
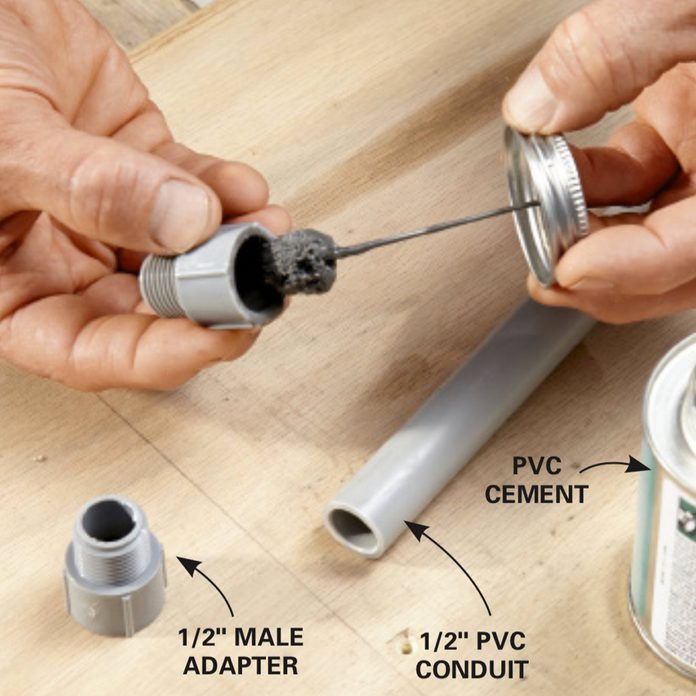
Cutting the conduit and remove any burrs from the inside of the cut finish. Swab PVC cement around the inside of the adapter. Printing the adapter onto the piping, twist it about a quarter turn and hold for a few seconds until the glue sets.
Step 2
Lock conduit to boxes
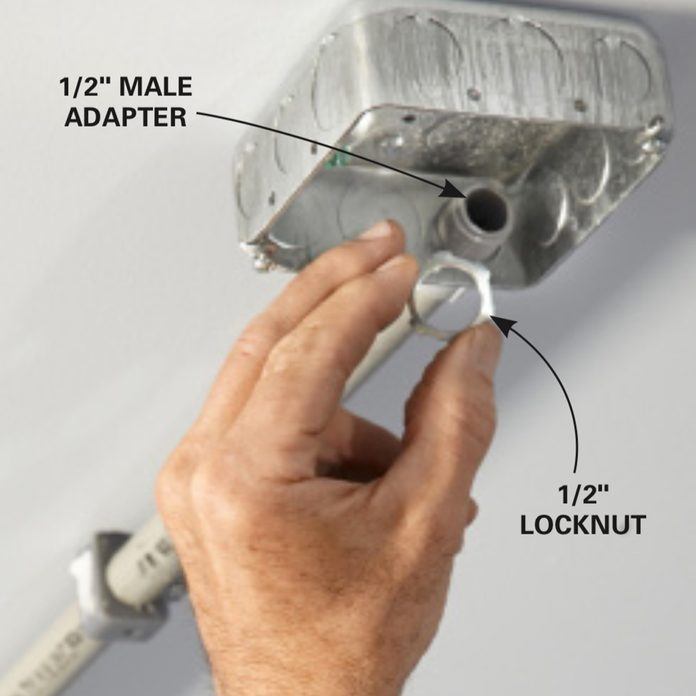
Once boxes are screwed in place, the conduit will stay put, and so it's tempting to skip or forget the locknuts. Don't. Every male fitting needs a nut.
51 Bright Ways to Organize Your Garage
![]()
Step 3
Secure the conduit with a strap
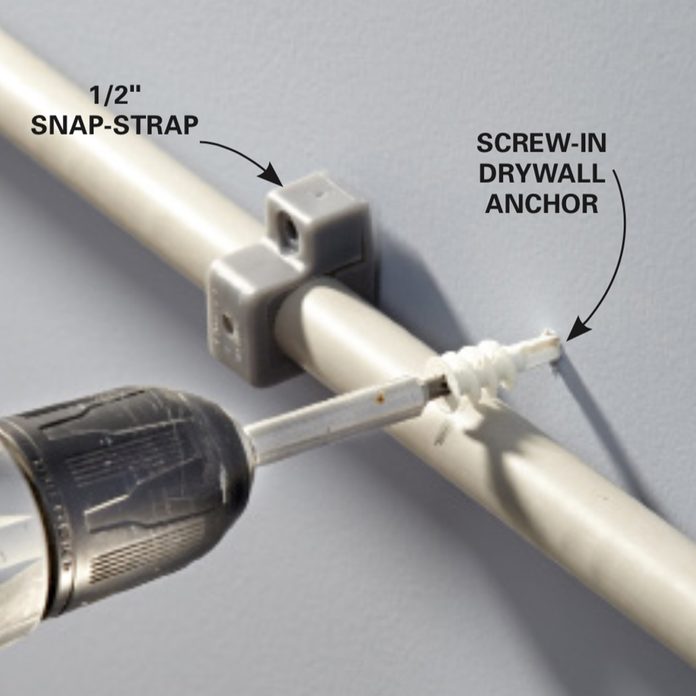
Position the ballast and bulldoze a screw through information technology. If you don't hitting a stud, move the strap aside and add a screw-in drywall anchor as shown here. Then screw the strap to the ballast.
In that location are several surface wiring methods, including metal conduit, but we chose PVC conduit because it's cheap and easy to work with. You tin buy uniform PVC electrical boxes, but at well-nigh habitation centers the selection is express, so nosotros chose to utilise metal boxes instead. Combining metal boxes and PVC conduit is fine, but unlike an all-metal system, PVC requires you to run a separate footing wire and bond it to each metal box or light fixture with either a screw or a special grounding prune.
There are a few different techniques for measuring PVC. You tin measure betwixt boxes and subtract for the fittings (Photo 5). Or you can install a bend or fitting on one cease and mark the other end for cut (Photo 3). And then information technology'south simple to cut the pipe. Nosotros bought a PVC Conduit Cutter (available at dwelling house centers or hardware stores), but yous tin can also use any fine-molar saw or even a miter saw. After y'all cut the conduit, ream the inside of the cut border with a knife or pliers handle to remove whatever plastic burrs.
Join the conduit to fittings with special PVC cement made for electrical PVC conduit (Photo 1). Use PVC male person adapters and metal locknuts to connect the PVC conduit to metallic boxes (Photo ii).
You can heat and bend PVC piping, but we don't show how hither. Instead nosotros used xc-degree bend fittings to turn corners. You can too buy offsets that position the PVC flush to the wall surface, but these aren't necessary if you use the type of straps we show in Photograph 3.
Straps for 1/2-in. PVC must be inside 36 in. of electric boxes and spaced a maximum of 36 in. between straps. There are at least two types of straps. We like the "snap-strap" shown in Photo iii. Drive a screw through the pigsty to hold the strap. If you don't hit a stud or something else solid, back out the screw, move the strap bated and drive in a drywall anchor (Photo 3) to secure the strap.
12 Heavy-Duty Garage Storage Racks
Stride iv
Add outlets and a light over your work
Brand sure the power is off
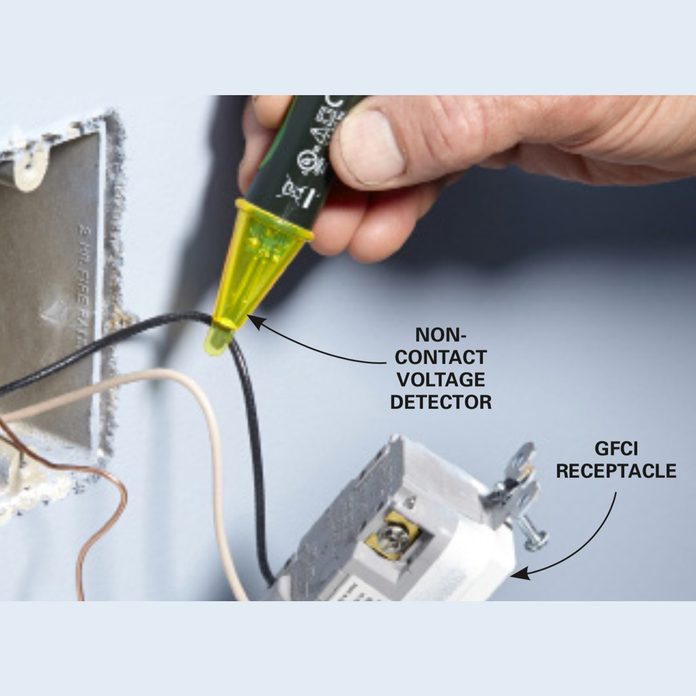
Hold a noncontact voltage tester about each wire to make sure the power is off earlier you practise any piece of work on the wiring.
Commencement turn off the excursion breaker to the outlet. Employ a voltage tester to make sure the ability is off. Then carefully remove the outlet—in our example it's a GFCI outlet—and as a last precaution, test all the wires in the box with a noncontact voltage detector (Photo 4).
If yous're planning to hang a plug-in ceiling light like ours over your workbench, first find the eye of your workbench. And then measure out the fixture you plan to use to determine how far apart the hanging bondage are. Programme to position the ceiling outlet direct to a higher place where the ability string leaves the light fixture. Then position the outlet and switch on the wall directly under the ceiling box location.
xvi Clever Infinite Saving Ideas for Your Garage
Pace 5
Run the conduit
Measure for conduit
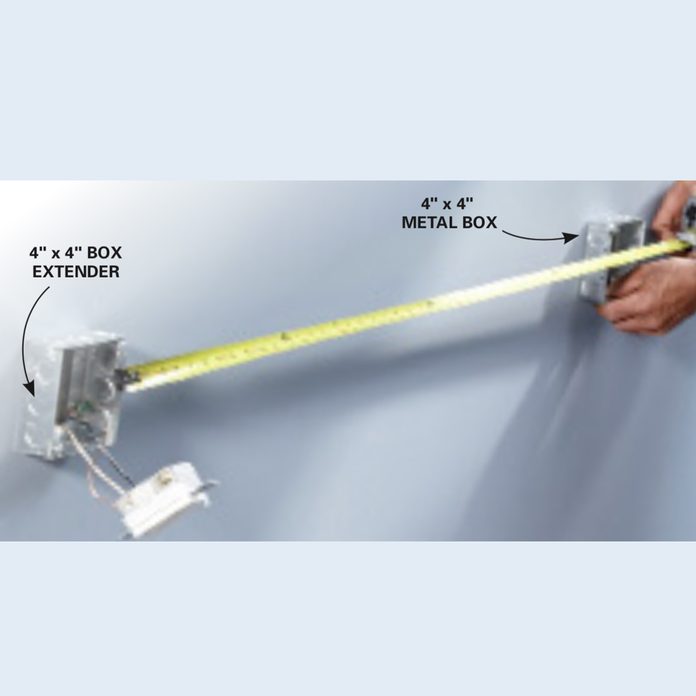
Spiral a box extender to the existing electrical box. So hold the next box in position and measure between them. Subtract 1/2 in. for the male adapters to determine the length of conduit needed.
8 Best Reader Garage Projects and Storage Tips
Step 6
Mount the next box
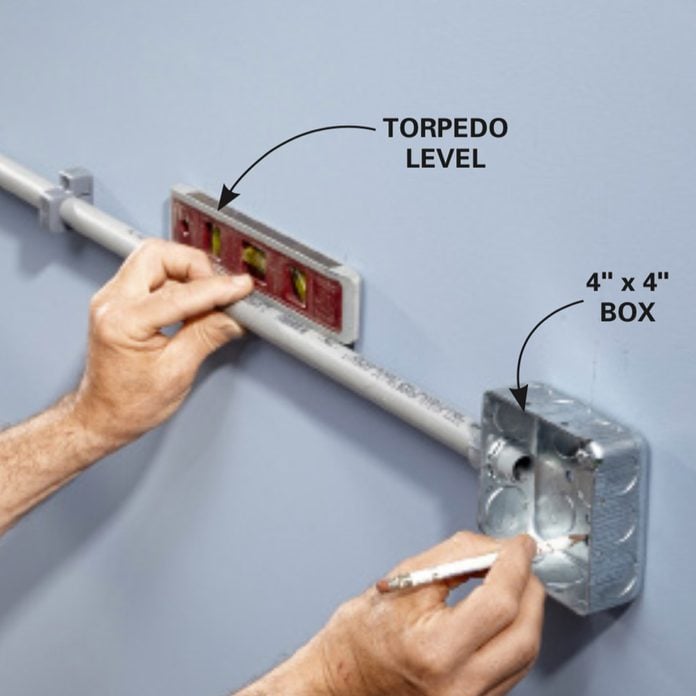
Extend the piece of conduit betwixt the two boxes. Agree it level and marking two holes in the dorsum of the second box. Remove the box and install drywall anchors so you can mountain the box to the wall.
How to Organize: Garage Storage Projects
Footstep 7
Mark the vertical conduit
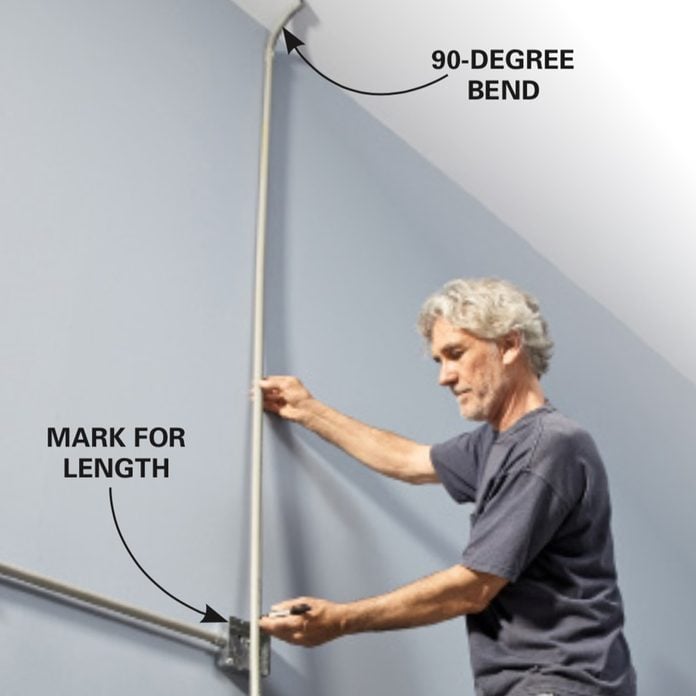
Connect a 90-caste curve to the conduit. Hold it against the ceiling and mark the summit edge of the electrical box on the conduit. Decrease 1/4 in. and cut the conduit.
To become started, screw a metal box extender to the outlet box. We used a unmarried-gang to 4-in. square box extender. You'll run conduit from here to the adjacent box. Concur the next outlet box in position and measure betwixt the boxes. Subtract 1/two in. to become the length of PVC conduit needed (Photo five). Cutting the conduit and glue male adapters to each stop.
Remove the round knockouts from the metal boxes by bending them out a little, and then grabbing and twisting them with pliers. Recollect to remove the smaller knockouts, not the large ones. Photo 6 shows how to marking for fastening the box. Bulldoze screws at the marks to come across if you hit solid woods. If not, remove the screws and install drywall anchors. Connect the two boxes with the PVC conduit and spiral the locknuts onto the male adapters in each box. Then screw the 2nd box to the wall. Finally, add the required clamps. If you want to add more outlet boxes, simply echo this process.
Photo vii higher up shows how to determine the length of the section of vertical PVC conduit running to the ceiling-mounted box. After marker the conduit, cut it, glue on the male person adapter, and connect it to the box. Apply a level to plumb this department of conduit and secure it to the wall with straps. Finally, add the last department of conduit on the ceiling and anchor the ceiling box to framing or with drywall anchors (Photo 2).
8 Groovy Garage Bicycle Storage Products
Pace 8
Run wire and make the connections
Push wires into the conduit

Hang the wire spools on a steel pipe or dowel so they tin spin freely. Bend the ends of the wires over and then they don''t catch on edges within fittings, then button them through the conduit.
27 Life-Changing Garage Organization Ideas
Step 9
Adhere the outlets to the raised cover
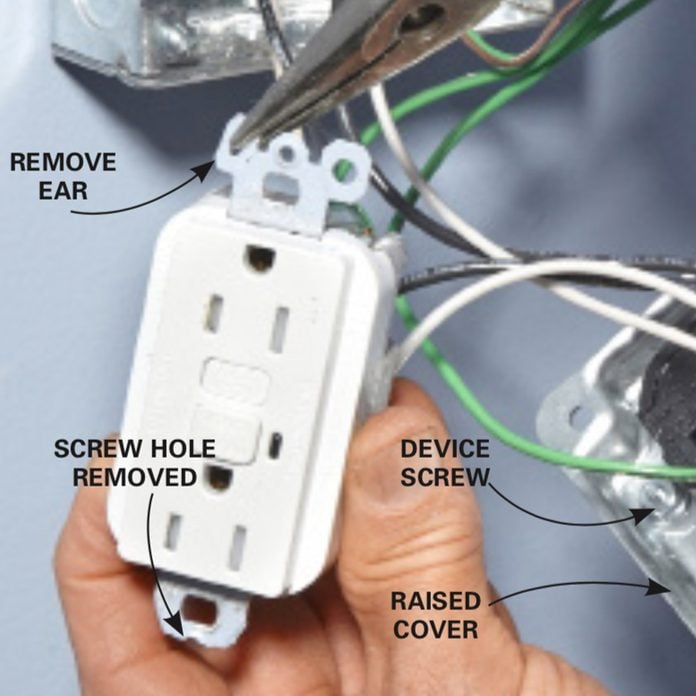
Break off the ears and cut off the screw hole to set up the outlets for mounting. Adhere them to the raised comprehend with the included device screws.
All of our conduit runs were adequately short, and we used solid copper rather than stranded wire, and then we were able to only push the wire through the conduit (Photo eight). If you have longer runs, y'all may have to start push an electrical fish record through the conduit and secure the wires to it and then yous can pull them through.
For a wiring scenario similar we show here, you'll need separate hot (blackness), neutral (white) and ground (light-green) wires. Leave about a pes of extra wire at each box.
After yous've run the wires to each box, you lot can start making the connections. We're providing footing-fault protection to the outlets and lite fixture by connecting them to the "load" side of the GFCI receptacle in the first box. Double-check to make sure the power is nevertheless off. Figures A, B and C below show the wiring diagrams to add outlets and a switched outlet for a hanging light.
It'due south important to make sure all the boxes are grounded. Do this by connecting the new (light-green) ground wire to the existing ground wire at the showtime box (run across "Ground Metallic Boxes and Fixtures," below). So connect the new footing wire to every metal box with a grounding spiral. Photo 9 shows how to mount the outlets and switches to the raised cover using the included device screws. Adhere the raised covers to the metal boxes with the included car screws and y'all're gear up to turn on the power and exam your work. Use a plug-in GFCI outlet tester at each outlet to make sure your connections are correct.
Basis metal boxes and fixtures
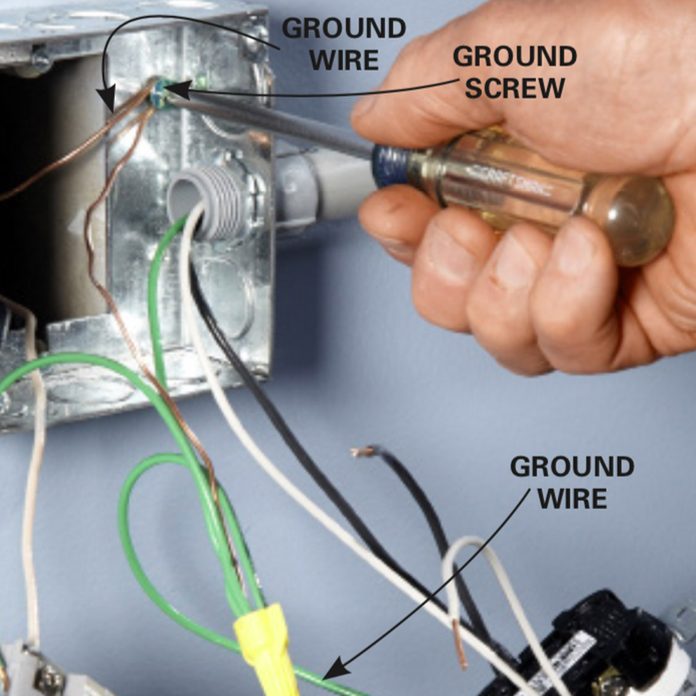
Since PVC conduit doesn't bear electricity, you'll run a separate ground wire through the conduit. This basis wire must be firmly fastened to every metallic box and low-cal fixture continued by the conduit with either a grounding screw or a special grounding clip.
Garage Security Tips
Pace ten
Add fluorescent lights
Cut an access hole

Offset with a hole in the centre to get the snips started. Our fixture had a knockout that nosotros removed. Otherwise, use a small pigsty saw to drill a starting hole. Snip out to the circle and follow information technology with the snips.
12 Best Means to Heat a Garage in the Winter
Step xi
Connect in-line fixtures
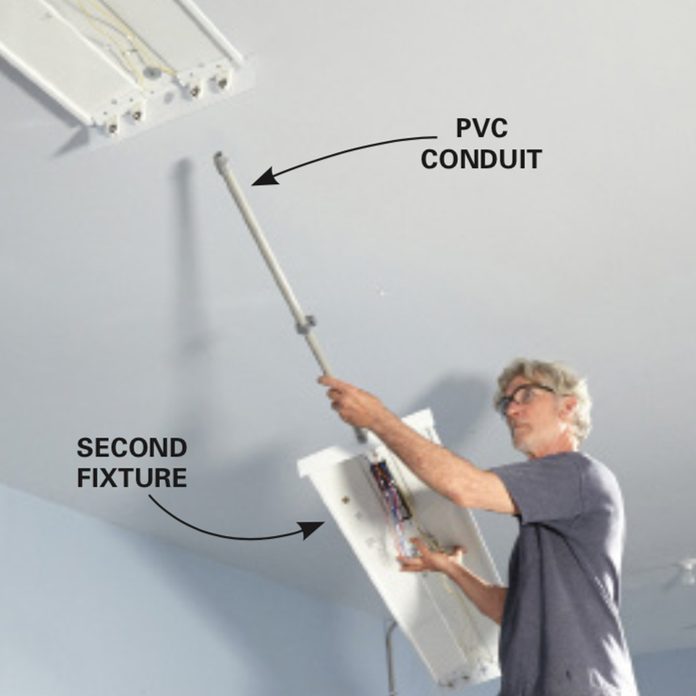
Hang the second fixture with the conduit already attached. There's no like shooting fish in a barrel mode to insert straight runs of conduit betwixt fixtures that are already fastened to the ceiling.
Pro Tips for Planning Your Dream Garage
Pace 12
Connect parallel fixtures
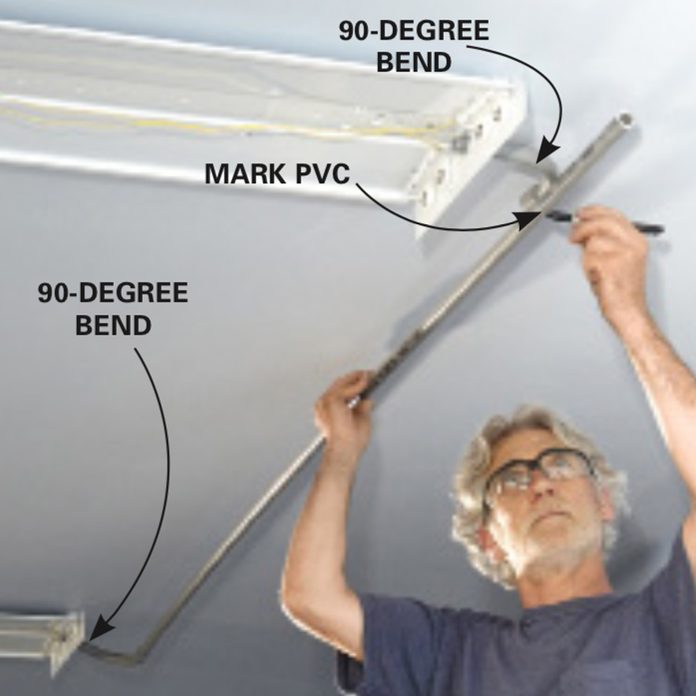
Connect a ninety-caste bend to a length of conduit. Install a 90-caste bend on the second fixture. Concur the conduit with the attached curve in position. Marker the conduit and cut it to length.
Organize Your Garage in One Morning
Pace xiv
Connect the fixture wires
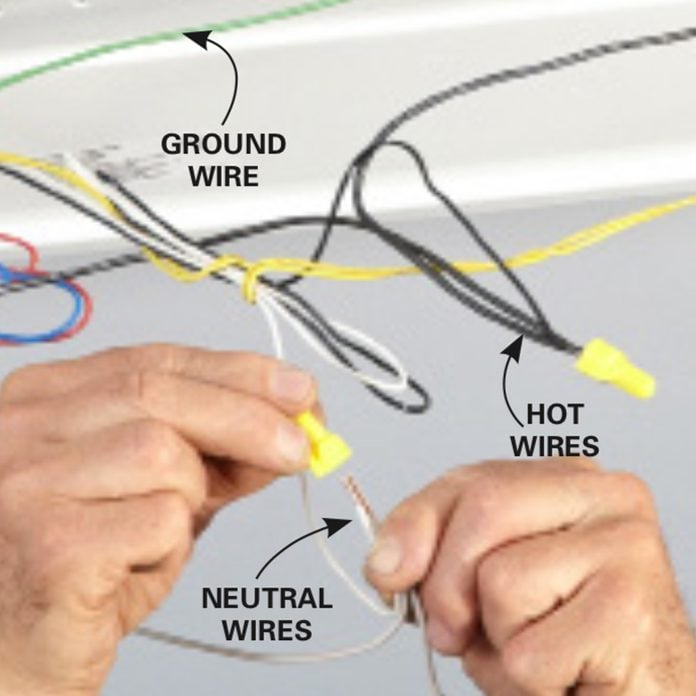
Strip the ends of the new wires and connect them to the wires in the fixture. Connect all neutral white wires together. Connect the colored fixture wire to the blackness wires.
How to Utilize Epoxy Floor Paint to Your Garage
Step xv
Install the cover
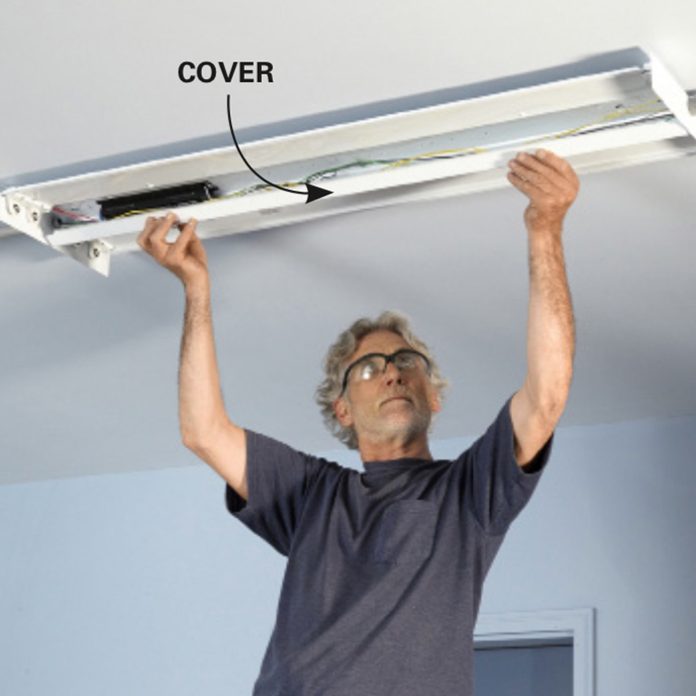
Finish the lighting installation by snapping the embrace nether the tabs. Then add the fluorescent lamps. Our fixtures too included a prismatic lens that we snapped on to complete the project.
First by making sure the circuit breaker for the existing lite is turned off. And then remove the light fixture and check the wires in the box with a noncontact voltage tester. If the electric box is in the right location, you lot tin can start by adding a fluorescent fixture over the box.
Photo 10 above shows how to fix the fixture. The diameter of the hole you lot cutting can be smaller than the electric box, but should exist large enough to reach through to access the wires in the box. After you lot cut the pigsty, smooth the edges with a file to remove abrupt edges and burrs.
If your preferred location for the lights is not lined upwards with the ceiling box, so first by adding a box extender to the existing ceiling light box (Photo 7). And then extend conduit to the first fixture.
You can install ceiling fixtures by screwing them straight to the wood framing higher up or hanging them from toggle bolts. To use toggle bolts, transfer measurements from the mounting holes in the light fixture to the ceiling and drill i/2-in. holes in the drywall. And then install toggle bolts on the fixture and only push them into the holes as y'all hold the fixture next to the ceiling (Photo 12). Measure, use a light amplification by stimulated emission of radiation or snap a chalk line (use erasable chalk) to center a row of fixtures and keep them directly.
Photo 12 shows how to connect fixtures cease to end. (We already drilled holes in the ceiling for the toggle bolts, simply they don't show in the photograph.) Photo 11 shows how to connect 2 rows of fixtures using xc-caste bend fittings. Afterwards all the fixtures are mounted and connected with PVC conduit, push wires through the conduit. Photos 13 and 14 to a higher place show how to connect the ground wire and make the connections to the fixtures.
Finish upward by replacing the covers (Photo 15), installing the fluorescent tubes, and snapping on the lenses if your fixtures include them. Turn on the power, flip the switch, and enjoy your brightly lit garage.
Avant-garde Garage Overhead Door Repairs
Originally Published: February 21, 2022

Source: https://www.familyhandyman.com/project/how-to-wire-a-finished-garage/
Posted by: venturahowell.blogspot.com
0 Response to "How To Run Lots Of Bulk Wire And Keep Them Straight"
Post a Comment